
The stability of beer foam is a critical characteristic that reflects beer quality and is one of the few consumer perceptible metrics for beer, and as such is a very important characteristic to measure and maintain for craft brewers. Many things can affect foam stability, from raw materials to the brewing process and the packaging process. Use of adjuncts as well as hops, and the act of dry hopping can affect foam stability. Mash regime, boil control, clarification (filtration and centrifugation) all exhibit effects on beer foam. In packaging, CO2 control can affect foam stability as well. This paper will discuss those important aspects of foam stability that can be controlled by the craft brewer. It will also describe simpler methods useful to the craft brewer for monitoring foam stability.


The importance of beer foam to the consumer cannot be overstated. It is one of the few beer analytics that is immediately noticed by the consumer. A good foam head is looked at favourably by the consumer, enhancing their beer-drinking experience and can cause a consumer to overlook some minor deficiencies in the beer. There is a direct correlation in the consumers mind to better quality. Beer foam is protective, preventing the direct contact of oxygen with the liquid beer, thereby slowing down oxidation. Beer foam, by its’ nature enhances the beer flavour, as the aroma carried in the beer foam can define the beer. Beer foam also helps to reduce beer bitterness by trapping some of the bitter compounds, removing them from the beer liquid. Of course, too much foam on a beer can be negative in most cases, although Pilsner Urquell in Czech Republic has created three different pours with ever increasing foam, such that one pour is 100% wet thick creamy foam (called Mliko). The varying amounts of foam create different characters in the beer that make each type of pour a different flavour.

Phil Leinhart, Senior Advisor, Technical Services at First Key Consulting says “Along with the obvious senses of smell and taste, beer drinkers also use sight for the enjoyment of beer. One of the most enticing visual aspects of a well poured beer is a creamy, stable head”
Beer foam is essentially all about surface tension. A nucleation site is required to create the CO2 bubble, but the beer must have carbonation and contain components that are foam positive, such as proteins from the malt and iso-alpha acids from the hops. The bubbles created want to destabilize and burst owing to the incredible amount of surface tension in the round shape, but the foam active compounds help to stabilize and maintain the bubbles. Foams with smaller bubble size are more stable, which is exhibited when nitrogen is used. Nitrogen is more stable in beer and as such created smaller, tighter more stable bubbles that are longer lasting as foam. The foam has a collectively huge surface area, such that a pint of beer foam can have the equivalent surface area of a normal sized room. Finally a nucleation site is required in the vessel or the container beer is contained in to create the bubbles which eventually become the foam head.
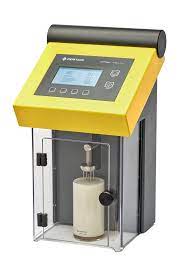
In measuring beer foam, the consumer generally looks at amount of foam, the creaminess of the foam, the collapse rate (or foam stability) and the cling or the foam that remains on the side of the glass. Most of the methods for measuring foam only look at foam stability, i.e. how long lasting is the foam. The standard method in use is the Nibem foam tester. A sample package of beer is cooled to a standard temperature and dispensed in a measuring device creating an excess of foam over the device. The Nibem unit has a probe that measures the time required to reduce the foam 30 mm. In order to standardize, the Nibem is maintained in a room with a constant temperature and pressure. Other devices such as the Steinfurth foam analyzer and the LG-automatic foam tester will also measure the foam stability albeit in different manners, but still generating the foam stability in time (usually seconds). This equipment is expensive and can be beyond the budget of a craft brewery. Other methods exist that can be accomplished without expensive specialized equipment.
The Constant method is one that can be used for minimal cost. In this method a well rinsed 1 litre beaker is used. Beer is pre-equilibrated to 4oC, and the package is placed in a clamp in a stand, 4 cm above the beaker. The clamp is inverted, pouring the beer rapidly into the beaker in up to 5 seconds. The package is allowed to drain for an additional 15-20 seconds. The beaker is covered with a glass petri dish and the beer liquid height, and the total height (beer liquid plus foam) is measured at intervals of 1.5, 2, 3, 4 and 5 minutes after covering. The foam height is calculated as the difference between the total height and the beer liquid height. If done under standard conditions this test can be used to compare production to determine if foam is remaining stable, increasing or decreasing.
One simple elegant method from the “Pope of Foam”, Charlie Bamforth involves adding 5 mL of degassed beer to a screw-top tube (15 cm length by 1.5 cm internal diameter). The tube is shaken in a 40 cm arc 10 times in 3 seconds. The foam height and liquid heights are measured from the tube bottom 30 minutes after shaking. The larger the foam, the more stable the foam is. This can be standardized to measure production as per the Constant method.
To truly measure foam from a customer perspective a beer is poured into a standard beer clean glass generating 1-2 inches of foam. Examine the foam under good illumination looking at foam colour (dull or white), texture (smooth even foam or are there rough patches) and are the bubbles small or large and even? Using a stopwatch allow the head to collapse and mark the time required for the beer liquid to show through. As in the previous two methods, this can be used under standard conditions to assess the production consistency.
If a brewer is having issues with foam, what can affect foam? Raw materials and brewing and packaging processes can all influence final beer foam. In terms of raw materials overmodified malt reduces foam owing to the reduction of the larger protein molecules that are foam positive. As more modification takes place, these proteins are broken down and are no longer foam positive. Conversely, if the malt is under modified, more of the foam active proteins are still whole and therefore increases foam. Higher friability and lower total soluble nitrogen will also reduce foam as in both cases lower protein is available. The use of most adjuncts decreases foam in that it will result in less malt therefore less protein. The use of wheat and barley as adjunct though will be foam positive and result in better foam quality. Hops play a role in promoting better quality foam. Isomerized extracts are better than pellets which are better than whole hops for foam, so the more processed the hop the better for foam. Iso-alpha acids in foam promote better foam cling while the use of hop oils and dry hopping in the process will result in poorer quality foam. The use of dried yeast will adversely affect foam quality. If re-using yeast, increased generation numbers will result in poorer foam quality, a good target is no more than 10 generations. However, when propagating new yeast, the first generation usually has poorer foam. Any parameters that adversely affect yeast growth such as higher temperatures and higher wort dissolved oxygen will result in poorer foam quality. Anything adversely affecting yeast health results in poorer foam.
In the brewhouse, wet milling is better than dry milling for foam. A protein rest or extended protein rest is foam negative as this results in the breakdown of the foam positive proteins more. Higher mash in temperatures, lower mash pH and reducing mash oxygen pickup is better for foam quality. Extended mashes are poor for foam as are the use of kettle finings. By reducing the residency time in the whirlpool and reducing wort cooling time, foam quality is improved. Of course, higher gravity brewing with adjuncts where the malt is reduced will result in poorer foam quality.
In fermentation, gentler yeast handling is foam positive, storing yeast with minimal mixing and at temperatures near, but not below 0oC. Pitching with lower viability yeast reduces foam. Daily removal of spent yeast in the fermenter and yeast removal improves foam quality by eliminating the leakage of exogenous proteinases from the yeast that reduce foam positive proteins. Lower temperatures during fermentation is better for foam, aiding in improved yeast health and the reduction of exogenous proteinases. Over foaming of fermenters in fermentation is foam negative as some of the needed proteins are left clinging to the sidewall of the fermenter. Stirred fermentations and rapid cooling after fermentation both results in poorer quality foam because of the pressure they put on yeast health.
In ageing, a shorter cooling/filtration or centrifugation run improves foam quality as does reduced handling or transfers (ie unitank process is better than using separate fermenter and ageing tank). Colder run temperatures and the use of nitrogen on tank transfer can both improve foam quality. In filtration, membrane filtration is more foam positive than diatomaceous earth filtration. The use of tannic acid for physical stabilization (i.e. haze) is foam negative but the addition of a small amount of zinc (0-2 ppm) is better for foam. Natural carbonation (krausening) is better than the use of a mechanical carbonator, and the use of a ribbon carbonator is more foam positive that a pinpoint carbonator.
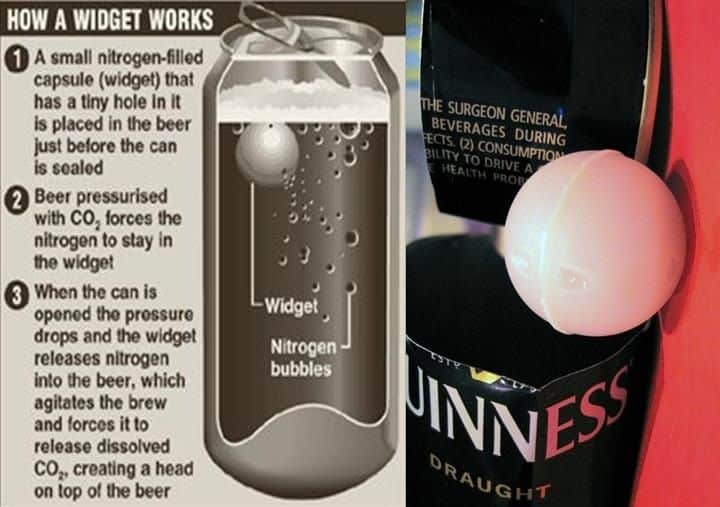
The use of a nitrogen/CO2 mix in packaging will improve foam. Aseptic packaging (no pasteurization) will result in poorer foam quality because of the non-destruction of proteases. Over gassing on fillers will reduce foam as will the use of wetting agents or defoamers in bottle rinsers. In final package the use of widgets and in dispense, the use of sparklers can increase foam quality.
If there are issues with foam, the brewer can look closely at their raw materials, the type and amount used as well as process in resolving foam issues. It must be noted though, that the brewer should employ a systematic scientific process in changing raw materials and process in order to determine the exact source of the foam issues.
To learn more about foam stability and beer quality, please contact us
By Rob McCaig, Senior Advisor, Technical Services